New Youtube Channel

Now that my home's internet speed is upgraded, I can make more videos!
This is my new channel https://www.youtube.com/channel/UCgW4rIH3Gg6Lc8v4G0QlqgA
Please subscribe!

Wednesday, April 29, 2009

Homemade Cendol


For you, Yuan Horng. Hope u can make it in the US. ;)

This is a Malay dessert , served with palm sugar syrup and coconut milk. When I was small, I used to think that it's made of worms! Well, they do look like green worms, wriggling around. Of course, I still ate them, worms or not.

The Singapore version uses only green bean flour. But the Malaysian version uses rice flour, or maybe mixed with some tapioca starch. Tapioca starch is more stretchable, whereas green bean flour gives the cendol a slightly springy texture.

So, if u can’t find green bean flour, u can just substitute it with tapioca/cassava starch.

Cendol is usually pressed with a cendol press, that looks like a murukku press, but not everybody has one at home. Or some use a metal bowl pricked with holes, or some homemade cendol use the holey ladle. The holey ladle makes the cendol short and stout. I like mine long and slender. I used to do this with the cookie press (with the piece with many small holes on)I need to think of a way that everybody can make this at home with easy to get apparatus.
And Ah!!!! I got it, a clean durable food grade plastic bag!

½ cup rice flour
½ cup green bean flour
3 cups pandan juice (1 cup loosely packed pandan leaves(washed, snipped with scissors), blended with 3 cups water, strained. If fresh pandan juice is not available, just use 2 tsp green pandan paste/essence with 3 cups of water)
1/4 tsp alkaline water

Prepare a basin of ice water. Mix the above ingredients together and cook on low heat until mixture thickens and turns glossy.
Fill mixture into a ziplock bag, snip off a small corner about 2-3mm (don't do it too big, it'll get bigger after being squeezed for some time). By using oven mittens, squeeze mixture out from bag, dropping into the ice water. Don't work slow, the mixture solidifies quite quickly!
When the cendol mixture has all been squeezed into the ice water, keep cendol in fridge together with the ice water.


5/5/09: I'm going to try other flour combinations, and will post whichever is the best. The flour composition in this post is less hard(when cold) compared to pure green bean flour cendol.

24/11/09: I tried using half tapioca starch with half rice flour. The result was DISASTROUS!! The cendol will melt. *sigh


Monday, April 27, 2009

Prunes Layer Cake 梅干千层蛋糕


The prune layer cake I ate b4, didn't contain prune jam in it. I tried adding in to get a slightly different coloured layer... Well, the colour outcome wasn't all that pretty either, unless I add in some food colouring. If u can't find it, just replace it with more condensed milk. I bought mine at Tesco.

I don't think I'll be making any layer cakes any near future, cos it made my electric bill sky high. I live in a house that pays comercial rates for electric and it's almost double of the domestic rate.. Not until I move into my new house (2010, maybe), only then will I embark on layer cakes again.

Ingredients (A)
225gm butter
50gm sugar
5 medium eggs, grade C
170gm Plum jam (warmed to liquify it a bit)
170gm sweetened condensed milk (1/3 medium can)
120gm cake flour

Ingredients (B)
225gm butter
50gm sugar
5 medium eggs, grade C
340gm sweetened condensed milk (2/3 medium can)
120gm cake flour
340gm dried Pitted prunes (cut into half and press flat)

Method:Ingredients (A)
1. Beat sugar and butter until light and fluffy.
2. Add in eggs one by one. Beating well after each addition.
3. Mix in plum jam and condensed milk
4. Add cake flour to batter and mix well.

Ingredients (B)
1. Beat sugar and butter until light and fluffy.
2. Add in eggs one by one. Beating well after each addition.
3. Mix in condensed milk
4. Add cake flour to batter and mix well.

Baking:
1. Preheat Oven in grill mode at 220C.
2. Line the base of a 9X9 inch baking pan and grease the sides. Preheat the pan over a pot of hot water or in the preheating oven
3. Place one ladle of (A) in the hot pan.
4. Spread batter evenly. Tilt pan left and right to level batter.
5. Grill for 7 minutes or until cake layer turns golden.
6. Remove cake pan from oven and press cake layer to release air.
7. Put in a ladle of (B) and repeat step 4,5 and 6. Arrange flattened prunes on top of layer (B) after step 4.
8. Continue baking cake layers alternating batter (A) and (B) until all batter is used up.
9. When done, leave to cool on wire rack for 10 minutes and overturn the cake. Peel the lining paper. Let the base dry properly and make sure the whole cake has cooled down before storing.

13/05/09: Sorry, I've mistyped the plum jam as prune jam. (Prunes are dried plums, like raisins are to grapes)
If u can't get plum jam, just do the batter in one batch. You can either add up the condensed milk or add up the sugar. If u want to add up the sugar, just follow the list of ingredients below.

450gm butter
200gm sugar
10 medium eggs
510gm condensed milk
240gm cake flour
340gm dried pitted prunes (cut half and pressed flat)

Method: Follow method of ingredients (B)


Note: If u find this cake dry, don't worry. It moistens up the next day. Anyway, it doesn't taste good on the same day. Just keep the whole cake in a tupperware.
Layer cakes can keep very well and they taste better when aged. 2 months in the fridge is not a problem. A week in room temperature is no problem. So, take ur time to slowly savour the cake, slice by slice.

Friday, April 24, 2009

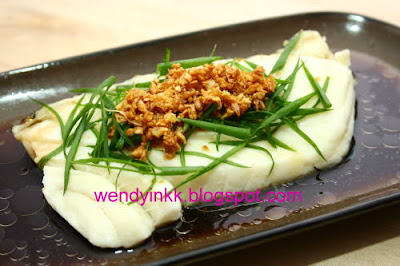
Steamed Cod 清蒸鳕鱼


It's one of the most expensie fishes around. This palm sized piece costs me around RM20.... and it was at offer price. It's Mike's favourite fish.
Steaming fish is really easy, and it keeps the kitchen clean.. :)

Not every fish will require so few ingredients, simply because cod doesn't carry a fishy smell, therefore, no ginger, no cooking wine is needed

1 pc cod, palm sized, 1.5cm thicness
2 cloves garlic, peeled, finely chopped
2 Tbsp oil
1 sprig spring onion, thinly sliced lengthwise
2Tbsp steam fish sauce

1. Rinse fish and pat it dry. Place on a plate and steam on high heat for 5-7 minutes, or until fish flakes easily when pricked with a fork. Remove from heat.
2. Pour fish juices away. Place sliced spring onion on fish
3. Heat wok and put in oil. Fry chopped garlic until golden.
4. Pour hot oil over fish. You will hear the spring onion sizzle.
5. Pour steam fish sauce over fish. Serve immediately

Thursday, April 16, 2009

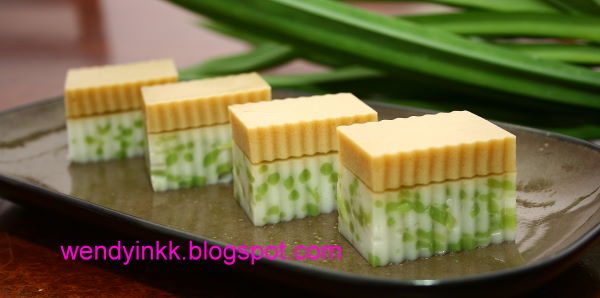
Cendol Agar-agar


This is for u, Melody. Hope it satisfies ur jelly craving! Baby in tummy will be happy!!!

I’ve tried making this many many years ago… and to my dismay, the cendol sets to the bottom(If urs are all on top, it means the agar solution is too hot when u added the cendol) I tried adding in some corn starch this time around, and the cendol ended up floating all over!

I’m happy!

*Note: If you're using store bought coconut milk, 1 coconut=200ml

Cendol Layer500ml water
170gm sugar
250ml water
1.5 Tbsp agar-agar powder (12.5gm)
extract from 1 coconut mixed with water totaling 250ml
small pinch of salt
30gm corn starch
500gm cendol (2 cups, drained) Make ur own cendol, see here

1) Mix agar powder with 250ml water, set aside.
2) Mix cornstarch, salt and coconut extract together, set aside.
3) Bring 500ml water and sugar to a boil. When solution has come to a boil, pour in agar mixture. 4) Bring a a boil again, lower heat and pour in cornstarch mixture, stirring all the while.
5) On medium heat , bring back to a boil. Remove from heat and put in drained cendol. Mix well.
6) Pour into a 10 inch square pan.

While the cendol layer is cooling down, do the brown layer.

Brown Layer
200gm gula Melaka (if using Thai palm sugar which is cream in colour, mix with some dark brown sugar to achieve colour)
500ml water
2 blades pandan, shredded and knotted
250ml water
1.5 Tbsp agar-agar powder (12.5gm)
extract from 1 coconut mixed with water totaling 250ml + small pinch of salt

i) Bring 500ml water, palm sugar and pandan knot to a boil and simmer until palm sugar has totally dissolved.
ii) Mix agar powder with 250ml water and pour into the pot. Bring to a boil again.
iii) Lower heat and pour in coconut extract, stirring all the while. When there are small bubbles on the side of the pot, remove pot from heat.
iv) Test cendol layer by touching surface. It should have slightly cooled and developed a film on top that does not stick to ur fingers, but should be wobbly. Pour in brown layer slowly, carefully using a sieve(there might be unwanted stuff in the palm sugar) and let it set and cool down.
v) Chill in fridge before cutting.

If your cendol layer has totally hardened, scar surface with a fork before pouring in brown layer.
You are free to do whichever layer first, But I like mine with the brown on top.

Or if u’re using agar-agar strips…
Do this…

Cook 25gm agar-agar strips with 1.5L water until totally dissolved. Divide agar solution into 2 parts.
Cook one part with the sugar and do step (4) to (6). While cooking the 1st part, keep the 2nd part warm.
Prepare the 2nd part of agar-agar solution by cooking it with palm sugar until dissolved. Do step (iii) to (v)


Lydia can't resist while looking at Mike photographing the jelly.
She must have one!


Tuesday, April 14, 2009

Steamed Pumpkin Buns 南瓜包


I bought one big pumpkin for my pumpkin jam, and there was more than a cup of pumpkin puree left.

Planned to make these into steamed buns, but in the end, I baked half of it.
I might have oversteamed it, as the baked ones turned out well, but my steamed ones sort of collapsed. I think I should steam them at medium heat, due to the high butter content, cos the baked ones were fine, as they were baked at a med low heat.
Tastewise, still fine. I quite like it, but I think I’d change the flour used to all bread flour the next time I make it, instead of a mix.

100ml water
1 sachet dry yeast
400gm pau flour
100gm bread flour
1 tsp double action baking powder
50gm sugar
300gm pumpkin puree
100gm butter
some pumpkin seeds for decoration

1. Dissolve yeast in water. Add in a pinch of sugar. Set aside and let it froth.
2. Mix pau flour, bread flour, double action baking powder and sugar together.
3. Make a well and pour in yeast mixture and pumpkin puree.
4. Combine well and knead until dough is no longer sticky.
5. Put in butter and continue to knead until butter is well incorporated.
6. Cover and leave to proof until double, about an hour.
7. Punch down and knead for another 10 minutes.
8. Divide dough into 20 portions, almost 50gm each.
9. Line tart tins with muffin cases.
10. Roll each portion into a ball and place into lined tart tins.
11. Leave dough to proof until double, about 45 minutes.
12. Steam on high heat for 10-12 minutes.

For Baked version
After step 8, Roll each portion into a ball and place into muffin cups. Leave to proof until double. Top with pumpkin topping and pumpkin seeds. Bake at 150C for 15 minutes.

To make pumpkin topping: Take 2 Tbsp pumpkin puree, mix with 1/2 tsp sugar and 2 tsp flour. Mix well, and put mixture into a clean plastic bag. Snip off one small corner and pipe as desired.


*** You might need to bake it at a higher temperature, as my oven browns bread very easily. 150C is just nice for my oven.


Thursday, April 9, 2009

Pumpkin Jam 南瓜果酱


This is supposed to be pumpkin kaya. But Mike insisted it be called pumpkin jam. To him, kaya must have eggs, and when it’s eggless, it’s jam.

It smelt great when it was ready, the whole house smelt of kaya! But the aroma was somehow lost after being chilled in the fridge.
B4 it was chilled, it smelt coconutty, after chilled, pumpkiny. Still it was ok.
A bit more healthy than the eggy kaya.

Recipes online says just cook in a pan over flame, but with my experience in kaya making (I come from a family that’s been making kaya commercially for more half a century), short cooking time makes it more perishable. (I’ve bought homemade kaya that turned bad after a week even when it was in the fridge!! That’s pan cooked, guaranteed!) Kaya is supposed to be double boiled over a long period of time, so that the sugar will not crystallize and the coconut milk in it won’t spoil for days. The kaya my mom used to make can be kept for more than a week w/o refrigeration and it’s not even kept in sterilized jars. If refrigerated, try keeping it a year!

So, why didn’t I double boil it? Well, the slow cooker is like a double boiler, but keep it on low heat.
High heat during the first hour won’t spoil it, cos it’s really snail slow to heat things up in a slow cooker.

If u don’t have a slow cooker and want to double boil it, do it for 3 hours.
If u plan to finish the jam in a day or 2, by all means, cook it direct over flame. I can’t finish it that fast, so better cook it slowly…

1kg pumpkin flesh
100gm sugar (U can put more)
100gm palm sugar
350ml thick coconut milk
3 blades pandan leaves, knotted

1. Steam pumpkin flesh until soft. Puree with a blender or mash it up.
2. Mix pumpkin flesh with coconut milk, and both sugars.
3. Place mixture into a slow cooker together with pandan knot.
4. Cook on high for an hour, low for 2 hours.


It's almost a month since I made this, and the jam is still in good condition, sitting in my fridge. I purposely posted this late, to see how long the jam can last in the fridge.
Last week, I made buns with this pumpkin jam, and they tasted good!

Update 1 : The jam spoiled at 6 weeks. Well, can't be compared to my mom's original kaya, cos there's so much less sugar. But nonetheless, it didn't spoil within 1 week.. kekeke

Update 2 : My friend gave me feedback that her jam was still good for 7 weeks.

Thursday, April 2, 2009

Radish Dumplings 萝卜板


There’s not a trace of radish in this dumpling. Why call it so? The shape…
This dumpling is shaped like a radish.

I first tasted this from a kuih hawker at Dataran Sunway. No where else I’ve seen this. And I got this local delights cookbook from Popular Book Store, and to my surprise, the recipe’s in it! OMG, I just can’t wait to try this out.

The cookbook’s proportion of ingredients is …. Incorrect. I had to adjust some. I had to add almost 70% extra water, if not the dough will remain as crumbs. Yeah, that bad!
And the amount of dried shrimps stated in the recipe scared the hell outta me when I weighed it. I only used 20% of it. Sometimes, it’s really frustrating when the recipe’s not all that accurate. If one has no experience in eating it or seeing it b4, one can never make it based on that recipe. I’ve corrected it, no worries, this one is accurate.

To make 24 pcs of radish dumplings:-

U need 24 pcs of cut up banana leaves (app 5cm X 10cm)
some oil for coating the dumplings and .......

Filling1 kg jicama/sweet turnip/sengkuang, peeled, cut into toothpick length and thickness. (or u can use a coarse grater, but this method will make the jicama wet, just squeeze some of the juices out)40gm dried shrimps, soaked, drained, chopped
1 shallot, chopped finely
1tsp salt, or more (How much salt depends on how salty the dried shrimps are)
2 Tbsp oil

Heat wok, put in oil. Saute shallots until fragrant and put in chopped dried shrimps. Continue to fry until very fragrant, put in salt. Mix well. Put in jicama. Continue to cook until jicama softens and turns translucent. Taste, if not salty enough, add more salt. It should be slightly oversalted. Dish up and cool. If there are juices, drain it. Shape cooled jicama into 24 oblong pieces by lightly squeezing them in palms.


Dough:
450gm glutinous rice flour
75gm all purpose flour
350ml hot water
2 Tbsp cooking oil

Just knead everything together until dough is smooth. Leae to rest for 30 minutes. Divide dough into 24 pcs, abt 36 gms each.


Assembly:
1. Take one pc of dough, flatten it. Put in one pc of shaped jicama filling. Seal up and shape into a radish.


2. Lightly coat each dumpling with oil and place each pc of dumpling onto a piece of cut up banana leaf. Steam on medium heat for 10 minutes.


All ready to be chowed down!!


Printfriendly

Related Posts Plugin for WordPress, Blogger...